Print

Author Topic: Wiimote-Controlled Sword Video and Contests for free Wii & Red Steel stuff!  (Read 2894 times)

Luigison

  • Old Person™
« on: October 18, 2006, 03:33:37 PM »


Check out this cool fan made Wiimote-Controlled Sword Video on YouTube.

If you haven't seen it yet the Red Steel Trailer is also on YouTube.

Red Steel hands-on preview and new screenshots at GameSpot. (Oct. 17th)

There's also an older Red Steel review on IGN. (Oct. 13th)

The official Red Steel website is http://redsteelgame.us.ubi.com/.  You'll soon be able to can order Red Steel here.

If you want to compete for Red Steel stuff and even a free Wii then join http://www.dojoofpain.com.  It's free and fun to make sigs, icons, desktops, etc. that could earn you free notebooks, t-shirts, the Red Steel game, a free Nintendo Wii, or other prizes.

(Yes, I'm trying to get a free Wii.)
« Last Edit: October 21, 2006, 04:10:37 AM by Luigison »
“Evolution has shaped us with perceptions that allow us to survive. But part of that involves hiding from us the stuff we don’t need to know."

Luigison

  • Old Person™
« Reply #1 on: October 21, 2006, 06:29:44 AM »
Luigison's Training 1.0: Finding and Capturing Images
      
For this training I will be using Windows XP, Firefox, Red Snapper, Snag It, etc.  If you have questions on any of these or alternatives that are not answered in this training please ask.

Before you can create a great desktop wallpaper, banner, or icon you need good source images to work from.  Of course you can creat your own from scratch, but it's easier and more representative of the game to use official artwork.  So I suggest starting with the Official Red Steel Site.  (See what I did with that link?  More about Links and Clicks in Training 4.0)  You might also what to check the images on IGN and Gamespot.  (Opps, I did it again.)

On the official website you'll notice "MEDIA" at the top center.  Hover your mouse pointer over it to reveal:


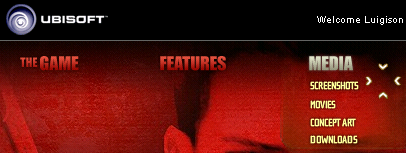
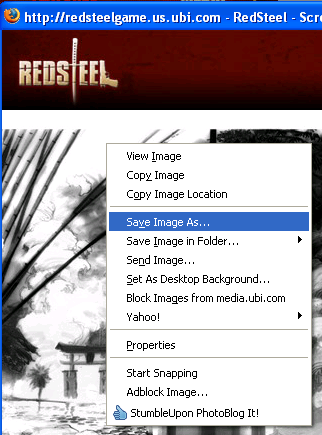
You can get some good backgrounds from any of the four choices, but let's go with "CONCEPT ART" for now since I'll being using that in Training 2.0 and 4.0.  At the bottom you will see some thumbnail images.  Click each image to see a preview of it.  Once you find an image you like, click it and a larger version will popup.  BTW, I'll use image six for the next trainging so you may want to snag it now so you can follow along next time.

Right click the image and select "Save Images As..." from the menu.


Now tell your system where to save the image, what to name it, and the file type. If this is the first image you've saved for Dojo of Pain I suggest making a new folder so that you can put everthing related to Red Steel in one place.  Either leave the name as is or change it to whatever you want.  I strongly suggest leaving the file type as the default for now.  There are times/reasons to change it, but that will come later.


Congratullations.  You now have a background image.  That was easy.  Unforntunantly it's not always that easy, but I'll do some morer easy one s before advancing too much.

Another, some would say THE, great source for images is Google Image Search.  I suggest using the Advanced Image Search.


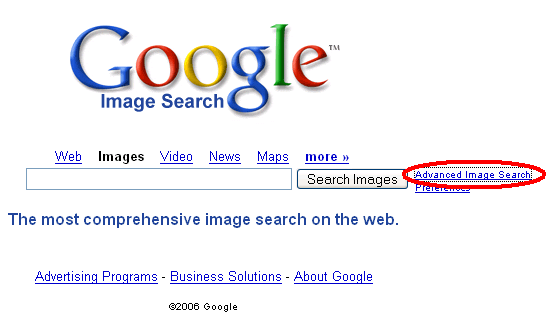
Type your search terms.  I started with "Red Steel".  Then you can refine your search by size, filetype, color, etc.  Experiment with these setting to find what you want.  I found a really good image of the Red Steel logo (00001.jpg) in red on a white background that I'll give you in Tutorials 2.0 and 3.0.

On the image search results page go through the images (refine your search if needed) and click an image that looks promising.  At the top of the page you can click "See full-size image" or simply look at it's context in the page below.  Now you can right click and save the image as before.

Okay, here's one more easy one before moving on.

The print screen (PrtScn) button is your friend.  If there is something on your screen that you want an image of simply press the PrtScn button then open your favorite image editing program like MS Paint or Photoshop and paste.  Now you have the entire screen(s) captured so you'll have to crop the image down to what you really wanted.  Next we'll use a method of capturing that won't require such cropping.

That was real easy.  Now on to some more program specific tools.

There are a lot of great screen capture tools available online.  If you are using Firefox I suggest the Snapper extention.  If your not using Firefox you can download it at
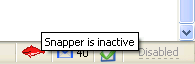
 http://www.mozilla.com/firefox/

Once you have have the Snapper extension you'll have to restart Firefox for it to load the first time.  At the bottom right you'll now notice a red snapper.  Snapper is inactive by default.


Let's go to http://www.dojoofpain.com/ to snap our first images.  Click the little fish on the bottom right to activate Snapper then left click the screen where you want to start snapping an image from, hold the button down and move the mouse pointer to the opposite corner of the area you want to capture.  Snapper will popup a save dialog box for you to select the images save options.  If you mess up just click cancel and try again.  Once you are finished click the red snapper again to turn him off. 

Here's an image I snapped a couple of days ago because of the numbers that were on it.


Since the above images contains dynamic elements you could not have used the "right-click/save image as" method to capture it.

Another method of screen capture is to use a stand along program like SnagIt.  There are so many different programs like it though that I'm not going to take the time here to explain how to use them all.  If you have a question please reply to this post or PM me.

It may be awhile before I can answer though.  My step-mother who lives about 2000 miles away had a massive heart attack last night so I'll be flying to be with her this weekend.  Her doctors either expect her not to make it or to have brain damage so I'm not sure if/when I'll be doing my other planned tutorials.

I plan on doing the following tutorials.

Luigison's Training 2.0:  Using MS Paint
Luigison's Training 3.0:  Using Photoshop's Magic Wand
Luigison's Training 4.0:  Links and Clicks

If there are any other tutorials you'd like please let me know.

Thanks.
“Evolution has shaped us with perceptions that allow us to survive. But part of that involves hiding from us the stuff we don’t need to know."

Luigison

  • Old Person™
« Reply #2 on: October 22, 2006, 10:19:39 PM »
For this training I will be using Photoshop CE, but the task I detail are the same in every version of Photoshop I've ever used. I also have Photoshop 7.0 on this computer and if you have questions about any version please reply in this thread and I'll help. For other training threads see the bottom of this post. Also, Gimp has a Photoshop skined version that can do nearly everything just like Photoshop. So if you don't have Photoshop go download a free copy of Gimp to follow along with. There will be a few slight changes, but the general ideas will be the same for every task.

For a detailed 8 paragraph explanation on how to find, capture, and save the images I will be using in this training see my thread Luigison's Training 1.0: Finding & Capturing Images . For the purposes of this thread I will assume you either already have the images used here or can easily get them from the links I provide.

For my first bit of training I'll show you how I made one of my desktop wallpapers.

Let's start by opening RedSteel_Temple_02_l.jpg that we saved in the last training with Photoshop. After opening it I suggest renaming and saving it so you'll always have the original to go back to if needed. I simply deleted the "_02_1" part of the name and resaved it.

Since we are making a desktop wallpaper and need the background image to be at least 800 x 600 we need to know the size of our current image. Click "Image" then move your mouse pointer to "Resize" and and "Image Size..." For future reference I will write such menu selections as "Image > Resize > Image Size..." See below:


Here you'll notice that the image is 800 x 639. On closer inspection of the image you'll probably see white horizontal bars going across the image. Since we need to reduce the image height by 39 pixels let's try removing the those white bars and see what that leaves.

To remove those white bars we will use the crop tool.


Once you've selected the crop tool click the left mouse button while hovering over the first top left non-white pixel of the image and holding the button down drag all the way to the bottom right non-white image.  Right-click on the image and select "Crop" if you are happy with your select or "Cancel" to try again. If you accidently did something to the image you can't undo then you'll need to use the "Step Backward" feature of Photoshop. "Edit > Step Backward"


Using "Image > Resize > Image Size..." you see that the cropped size is now 800 x 548.  We wanted a height of 600 so we have a couple of things we could do to achieve that. We could "Step Backward" and recrop so as not to take off as much of the height and leave a little of the white bar(s). We could add back to the height and fill the space left with color, a frame, and/or text. Or we could resize and distort the image. I typically would not pick the later, but it will work okay for this image since we will be stretching a large image by only about 50 pixels. If this was a smaller image or had a lot of straight lines like a city scape I would not distort the image.


On the "Image Size" menu you will need to uncheck the "Constrain Proportions" box. Now that the the links that tied the width and height of the images are gone you are free to change the dimensions independently. Type "600" in for the Height and click "OK". The image will be stretch/distorted to 800 x 600.


If the image looks fine to you then it's time to save it.  If you did not rename the image earlier I suggest you select "Save As" from the "File" menu and give it a new name to save it under.  This way you can go back to the original if needed later. Be sure to select an appropriate file type to save it as. (I may do a training thread on file types later if people ask.) Don't close the image or Photoshop.

You now have a background for your desktop wallpaper that needs more to make it a Red Steel wallpaper. For this I used the Red Steel logo I mentioned in Training 1.0. Download it (if you haven't already) and open it in Photoshop.

Select the "Magic Wand Tool" and click the white space of the Red Steel image making sure not to click too close to the red of the logo itself.


Now you have the white background selected, but we want the logo itself so right-click and pick "Select Inverse" to switch the selection to the logo. (Note: We did not select the logo itself because the letters are cut and seperated so we would have had to add each part of the letters one at a time.)

Looking closely at the outlined selection you may notice that the two white areas around the trigger are not outlined. If we were to paste this image over another one the areas around the trigger would cover the background. To fix this we need to right-click the white areas we want deleted and select "Subtract From Selection".


From the main menu select "Edit > Copy". Then click the bar or image of the background we made earlier. (You may want to change tools so you don't use the magic wand on the background. Select "Edit > Paste". If you are happy with this then "File > Save As". If you don't like what you pasted then "Edit > Undo Paste or Step Backward" and go back to fix the logo.

The final product should look something like this.

My tutorials:

Luigison's Training 1.0: Finding & Capturing Images
Luigison's Training 2.0: Photoshop Magic Wand & Resizing (this is it)
Luigison's Training 3.0: MS Paint Image Editing (coming soon)
Luigison's Training 4.0: Links, Clicks, & HTML (coming soon)

If there are any other tutorials you'd like please let me know.
“Evolution has shaped us with perceptions that allow us to survive. But part of that involves hiding from us the stuff we don’t need to know."

Luigison

  • Old Person™
« Reply #3 on: October 24, 2006, 11:32:40 AM »
My very first YouTube "video":  http://www.youtube.com/watch?v=LK5IYf1V2l4
“Evolution has shaped us with perceptions that allow us to survive. But part of that involves hiding from us the stuff we don’t need to know."

Luigison

  • Old Person™
« Reply #4 on: October 30, 2006, 01:02:25 PM »
This thread has turned in to a sort of blog so I guess I could let you guys know my current status:


Woah!  I came back to find that I'm still in the lead and could already get a notebook and t-shirt, but I'm holding out for a Wii.  If something happens and I can't get a Wii I'll settle for a copy of Raymon Raving Rabbids and/or Red Steel, or a few Wiimotes and/or Nunchucks.

Thanks to TEM and Boo for joining and anyone else who joined and/or clicked my links (see first post abover or http://dennisshows.stumbleupon.com/ ). 
“Evolution has shaped us with perceptions that allow us to survive. But part of that involves hiding from us the stuff we don’t need to know."

Print